
|
Class Status
Check this link prior to every class for the most current weather and local training conditions. The weather may be good or bad at your house, and just the opposite here.
Editor's Choice
|
|
|
"The Proof is in the Weaving"
 Overheard at the weave poles: I know I need to be up here to push on my dog's line so she'll make her entrance, and I'm not sure I can get there;" and "I'd like to push around the exit end to set the next line, but if I get that far ahead of my dog, she'll pop out." Sound familiar? It's a litany heard endlessly at competitions across the country.
- With the addition of weave poles to the AKC Novice Standard class, now only UKC AG I and CPE Level 1 do not have weave poles in the Standard classes. Weave poles are present in almost all venues at a very early level (USDAA and NADAC have had weave poles in their Novice levels since the beginning). Consequently, anyone training in agility should be working on this obstacle from the start of training. You can no longer leave it until "later." There are many different ways to teach your dog to weave, but they all ultimately lead to the same place: competition. Are you completing your dog's weave pole training before taking her into the ring? If you think you have, consider the following questions:
- Can your dog make a weave pole entry regardless of where you are (behind, ahead, lateral) and regardless of the speed of her approach?
- Will your dog continue to weave all of the poles regardless of what you are doing: running ahead, recalling through, pulling up, turning in front, crossing behind, falling, or moving away laterally?
- Will your dog finish all the poles while you run ahead to set up a tight turn at the end of the poles? While you push around the end of the poles from either side? While you turn a full 360 degree in front?
- Will your dog do all these things in places other than her familiar training areas?
If you cannot honestly answer "yes" or just plain don't know, then you still have some work to do.
- It takes mastery of all these parts to consider your weave pole training complete. It doesn't make any difference how fast your dog can get through the poles if she cannot find the entry or if she won't stay in and finish all the poles. In a rush to get dogs into the competition ring, many train the dogs to the point of being able to do the obstacle (get into the poles with the handler's help and manage to weave in and out of the line of poles with the handler close by). Then they figure the dog knows its job. Not until people get into competition and encounter new situations do they discover that, although Zippy may be doing her job great in the backyard or at agility class (when the handler is right there and there is no pressure), in the show ring it's another story altogether. Many people overlook the step that helps to decide just how well Zippy knows her job. This is where proofing the weave pole performance comes into play.
- When you "proof" a performance, you want to test the dog's training beyond what might be encountered or required in the ring. To put it in perspective for some: for those with competitive obedience backgrounds, would you ever consider taking a dog into the obedience ring without having proofed the sits and downs beyond the one-minute sit and three-minute down required to pass your CD? Of course not. Yet, thousands of people take their dogs into the competitive agility ring without proofing their obstacle performance. Some people do proof their contact performance, but few seem to proof the weave poles.
- What does proofing mean with regard to weave pole performance? You want to proof each part of the performance--entry, weaving, exit-beyond what you'll need in the ring. At a minimum, you need to work on every handling, approach, and departure move you can think of and do it in a logical progression.
- As you work through your proofing program, you will encounter times when the dog pops out of the weave poles. Exactly how you correct depends on how you trained your dog to start with. Ultimately, you want to help the dog be successful the next time through. For example, my dogs were taught the weaves with a combination of channel, guides, and hands-on. When they make a mistake during the proofing process (note: I said "when" not "if"), I will repeat the same move but make it more likely the dogs will succeed by reducing the level of distraction. For example, if I am working on proofing my dog staying in the poles while I am driving away and ahead of the dog, I do not go as far ahead as I did before. If I am moving out laterally, I ease the angle of my lateral movement. This will enable the dog to be successful and be reinforced either through a tossed toy or a Tug 'N Treat stuffed with good cookies. If the dog is not successful a second time, I gently take it through the poles with my hand in the collar, reminding the dog of the job. Then, we reattempt the obstacle, ensuring the dog succeeds by lowering the level of distraction even more.
- Remember that weaving is a physically demanding activity. Unless your dog is manic for the weaves, doing the weaves repeatedly may become demotivating. Keep your proofing sessions short and use many rewards. Also, before you step out into your yard to train, have your plan prepared. Know exactly what you are going to do, how you are going to do it, how many times you are going to do it, and stick to the plan. Always try to end on a high note and leave the dog wanting to work more.
-
Proofing the Entry
When you are working on proofing your entries, you want to proof everything you can think of.
Step l Start with the basics
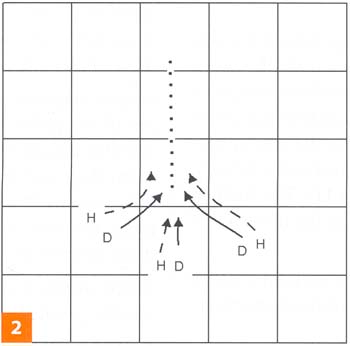
Start with working on the basic skill. Can the dog find the entrance with you standing there, sending her to the poles? Can she find the entrance if you recall her through the poles? Off your right hand turning away from you? Off your left hand turning away from you (see Figures 1 and 2)?
Step 2 Add the approach
When you have worked through all the above options with just the poles, add an approach jump. Put yourself into the equation by running with the dog and do the same steps (send, recall, run with the dog turning off your hands) again.
For people with high-drive dogs, test to see if the dogs can hit and hold the entry with a full speed approach. Many times fast dogs can successfully find the entry, but when approaching from straight on and at top speed, they have trouble holding onto the weaves and end up skipping the second pole.
Step 3 Add the crosses and options
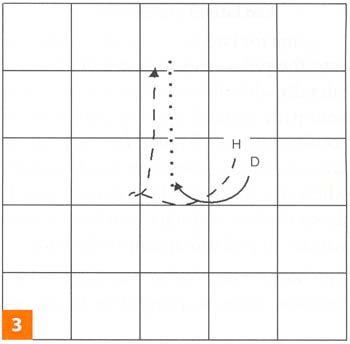
Start proofing the entries in which you cross before the dog enters the poles (see Figure 3). Vary how tightly you can cross in front before the poles; cross behind the dog after she enters (see Figure 4). Vary how sharply you cross behind the poles, remembering the further away from the obstacle you cross, the less chance you will have of pulling your dog out. If you are proofing a cross behind the poles, you will want to cross more and more sharply (see Figure 5). Approach the poles with other obstacles nearby that the dog has to ignore while seeking the entrance (see Figures 6 and 7).
Step 4-Research
Finally, go back through those old course maps and find courses with ugly weave pole entrances. Proofing your entries is not just about getting the dog into the poles, but also about setting the correct line as you approach the poles. Many factors influence whether your dog has the best chance to enter the poles correctly. Your job as trainer is to teach the dog to seek the correct entry, regardless of where the handler is.
-
Proofing the Weaving
The second part of proofing weave poles is the actual weaving behavior. The dog's job in the weave poles is to weave as many poles as are in front of her nose, despite distractions.
Variation in the handler's position is one of the most common distractions the dog encounters in weave pole performance.
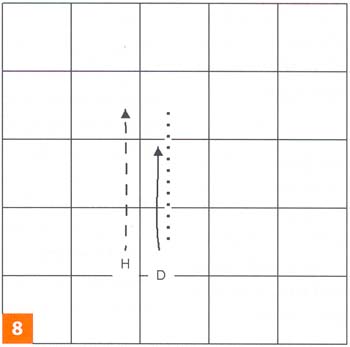
Step l Move ahead in the weaves
To begin your proofing, start simply. The goal is for the dog to stay in the poles while you move ahead of her while she is weaving. Once you load the dog into the poles, you want to gradually increase your pace to be at least two poles ahead of your dog when she reaches the end (see Figure 8). Ultimately, just how far ahead of your dog you need to be will depend on what line you want to set. To get the most from your proofing, you want to work until you can load your dog into the poles, leave her, and run to the end of the poles to wait for her to arrive. Then it's party time!
Step 2 lncrease the distance
As the dog successfully completes each set of poles with your moving ahead, increase how far you get ahead-3 poles, 4 poles, and so on, and vary the speed with which you move. Start moving gradually and consistently and work up to moving away abruptly, as if you forgot what you were going to do on course (not that that's ever happened to any of us). Be sure to work this challenge from both sides.
Step 3 Add lateral distance
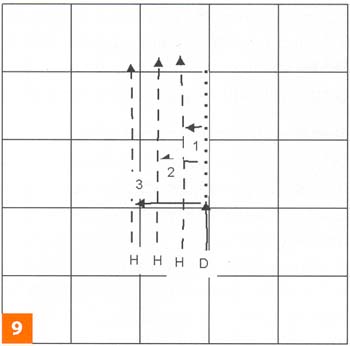
Now that your dog is a confident weaver with you working closely parallel to her, the next step is to increase your lateral distance. Many people tend to always handle their dogs fairly closely in the weave poles. This may be fine, but if this is as far as you ever go, you are denying yourself a handling tool. You also want to be certain your dog can handle your not being right on top of her. To proof this, send your dog to the poles and set a handler's line that is laterally off the poles, but still parallel (see Figure 9). Start close and then move out with each successful performance. "Close" is relative, depending on the size and drive of the dog. For a small dog, "close" may be one stride. For a larger, more driven dog, this starting point could easily be much further out. When the dog is successful, reward her and then move a bit further out. To weave comfortably with- out the handler right on top of the dog is crucial to success in many gamble sequences. For many dogs, this is more difficult than your just moving ahead of them, but not as difficult as your moving away from the poles laterally, so it's a logical step between the two.
Step 4 Add lateral movement
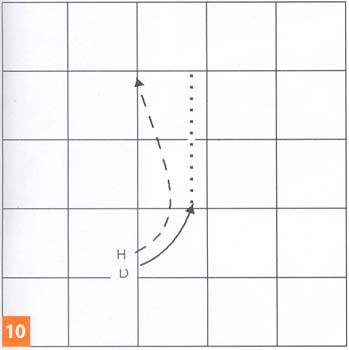
Proofing for lateral movement comes next. Again, load the dog into the poles, and then gradually move away from the poles laterally while he's weaving. Don't make any sudden changes to your path. Instead, set a line that moves you away from the poles consistently (see Figure 10). You can increase the lateral distance as your dog becomes more confident. You also should vary when you start your lateral move (see Figure 11). The further down the line you start your lateral move away, the more likely you are to pull out an unproofed dog.
The bottom line is that you want to be able to make any move necessary when working at the weave poles, without restriction.
Step 5 lncrease the distractions
Once your dog will stay in the poles regardless of your position, you can raise the level of distraction. Take one of her favorite toys or a stuffed food tube/Tug ON Treat and place it on the ground about 10' away from the poles (see Figure 12). It is helpful if you have a training partner or assistant for this step since you do not want the dog to get the toy in the event she bails out of the poles. Take the dog through the poles, positioning your- self between the distracter and the dog. If she gets all the way to the end of the poles without noticing the distraction, dump an- other toy or food tube on the ground off the end of the poles as a reward for her performance. Next time through, bring the distraction closer so she has more of a chance to notice it.
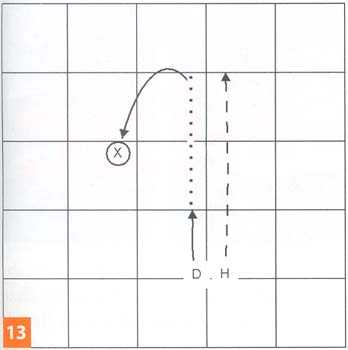
If she does notice the toy but chooses to ignore it and does her job, when she exits the poles, praise, and send her back to get what she ignored. This will help her realize that she will eventually get what she wants. Next time, handle the dog on the opposite side so there is nothing between her and the distracter (see Figure 13). If successful again, reward and then move the distracter closer.
If she bolts out of the poles, have your partner remove the toy before she gets there. If you train alone and she gets the toy, sim- ply take her by the collar, remove the toy, and place it a bit further out than it was, thereby decreasing the level of the distraction. Take her back to the line of poles and repeat the performance. When she is successful, be sure to make a big deal of it, playing enthusiastically or jackpotting her with many tiny treats.
Step 6 Add moving distractions
When you have gotten the distracter close to the poles, and the dog is still going past it, then you can up the ante once more. Carry the distracter in your hand and throw it while the dog is moving through the poles. The motion is much more likely to get the dog's attention than the inert distracter. If she continues to finish her poles, immediately upon her correct exit, send her over to her toy. Again, if she pulls out of the poles to chase the toy, call her back or catch up to her, immediately remove the toy, and try again.
Proofing the Exit
The final step in proofing weaves is one that is not crucial for many people, but it may spell the difference between first and second place or between qualifying and not qualifying. This step is the efficiency of the exit line. This is one place where you can shave feet (sometimes yards) off your course distance and fractions of seconds off your course times.
Almost everyone starts by teaching their dogs to drive straight out of the poles. But, we also must teach them to respond to verbal and body cues that we use to change the line when needed. Many dogs will stay in the poles while the handler moves ahead, but as soon as the handler begins to rotate into a crossing movement, they will leave the poles. You need to proof your dog on these movements as well.
There are five basic moves at the end of the weaves that dogs must be proofed for (right and left are relative sides of the poles):
1. The push around from right to left (see Figure 14) where the dog is on the handler's left and must exit sharply to the left without a side switch
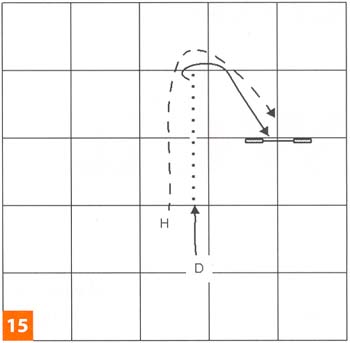
2. The push around from left to right (see Figure 15) when the dog is on the handler's right and must exit sharply to the right without a side switch
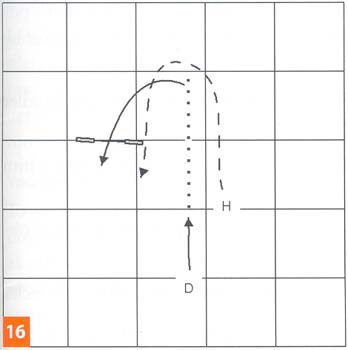
3. The push around from left to right with a side switch (see Figure 16)
4. The turn in front (see Figure 17) where the dog is on the handler's right and must execute a side switch to the handler's left, side 5. A 360 degree turn at the end of the poles.
As you attempt each move, be certain that your handling (footwork and turn timing) is solid before adding your dog to the mix. If you cannot master the mechanics of the move without your dog, do not begin to proof it. If you can't get the moves right by yourself, how can you convey the proper information to the dog? Work on each move methodically, and when you do add Zippy to the mix, be certain to reward the dog immediately upon successful completion of the move-not after the next obstacle or at the end of the sequence. You want to be certain the dog associates the reward with the weave pole performance.
Without doubt, the weave poles are the most complex agility obstacle we teach our dogs. Many people take a dog through its entire competitive career without taking any steps toward proofing the performance. Yet, these are most likely the handlers you hear bemoaning the fact that they cannot make a particular move at the weave poles because Zippy will miss an entry or pop out. Do yourself a favor and thoroughly proof your dog's weave pole performance. The judges give you enough to focus on without being anxious over something that is 100% within your control. Proofing will provide you with a greater sense of confidence when encountering the wide variety of weave pole challenges seen in to day's competition ring.
Note: All 17 course exercises are available in one zip file, 166kb: Download
|
|